Find more how-to guides and recipes at charlotteslivelykitchen.com
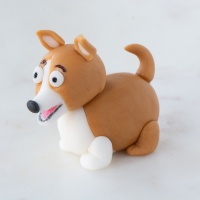
How To Make a Fondant Corgi
How to make a fondant Corgi, perfect for decorating cupcakes or birthday cakes.
INGREDIENTS
- Fondant Icing
- A little water
- Gel food colouring - I used Sugaflair Caramel/Ivory for the body and Liquorice for the nose but any similar colours will be fine.
- Food colouring pens - Black, brown and pink
- Mini rolling pin
- Fondant modelling tools
- Cake decorating brush
INSTRUCTIONS
- Colour some of your fondant light brown using the caramel/ivory colour (for the corgi's body) and some fondant black (for the nose).
Make the body
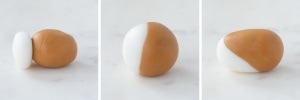
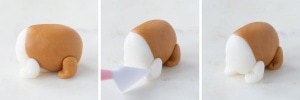
- Roll a ball of ball fondant icing about the size of a 50 pence piece. Get a ball of white fondant icing about a ⅓ of the size of the brown fondant. Roll the two balls together in your hands, being careful to stick the two colours together without mixing them. Roll the ball into a short sausage shape with the white at one end and the brown at the other. This is your corgi's body.
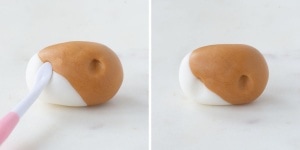
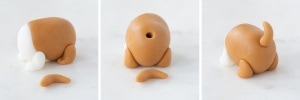
- Use your scoop tipped modelling tool to make 4 small dents at the base of the body where you'd like the legs to be attached.
- Make the legs by rolling four small sausages of fondant about 1 cm long (2 in white fondant and two in brown). Add a bend about ⅓ of the way down each to make feet.
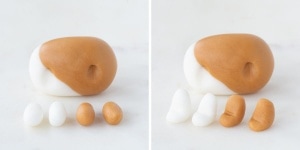
- Brush the dents you made on the corgi's body with a very small amount of water (this will help the legs to stick). Stick the legs into the dents you made on the body - The two brown legs at the back and the two white legs at the front. Use your blade tool to mark a few lines on each foot to represent toes.
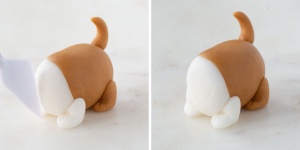
- Make the tail by rolling a sausage of brown fondant slightly larger that those you made for the legs. Roll one end into a point for the tip of the tail and bend the sausage into a curve. Make a hole at the top of the back of the corgi's body. Use a little water to stick the tail to the hole at the back, the tail should curve over towards where the head will be.
- To finish the body, use your blade tool to make some random lines in the white section at the front of the corgi to represent the fur.
Make the head
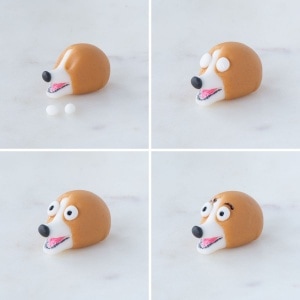
- Roll a ball of white fondant a little smaller than a 10 pence piece. Carefully roll one side of the ball to elongate it to make the dog's muzzle.

- Thinly roll an oval of brown fondant large enough to cover the head. Cut a small notch in the fondant. Lay the brown fondant over the white head, lining up the notch you cut with the top of the nose. Carefully wrap the brown fondant around the back of the head, leaving the muzzle white. Trim off any excess. Use your scoop tipped tool to smooth the brown fondant into the white, especially around the eye area. Using your tool, slightly flatten the fondant where the eyes will go.

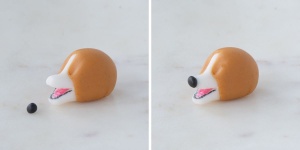
- Make the mouth by laying the head on its side and carefully cutting the muzzle in two. Open the mouth slightly and colour the inside with the pink food colouring pen. Gently draw an outline on the bottom inside of the mouth using the black food colouring pen.
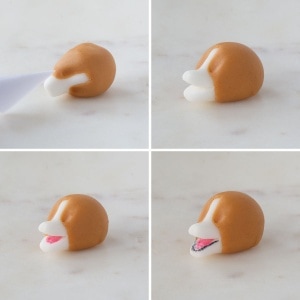
- Roll a tiny ball of black fondant and stick this to the end of the nose with a little water.
- Roll two small balls of white fondant, flatten them slightly and stick them to the face to make eyes. Use the black food colouring pen to add a pupil to each eye. Draw an eyebrow over each eye using the brown food colouring pen.
- Roll out a small thin oval of brown fondant. Make two tiny sausages of white fondant and form the ends into a point. Place these onto the brown fondant with a bit of space in between. Gently roll the white into the brown. Cut around the white with a bit of a brown rim. This should look like pointy ears. Cut two slits in the top of the corgi's head and stick on the ears.
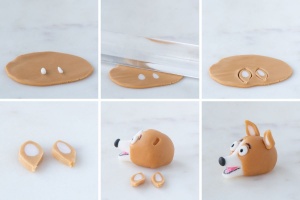
Put it all together
- Finally stick the head onto the body.
