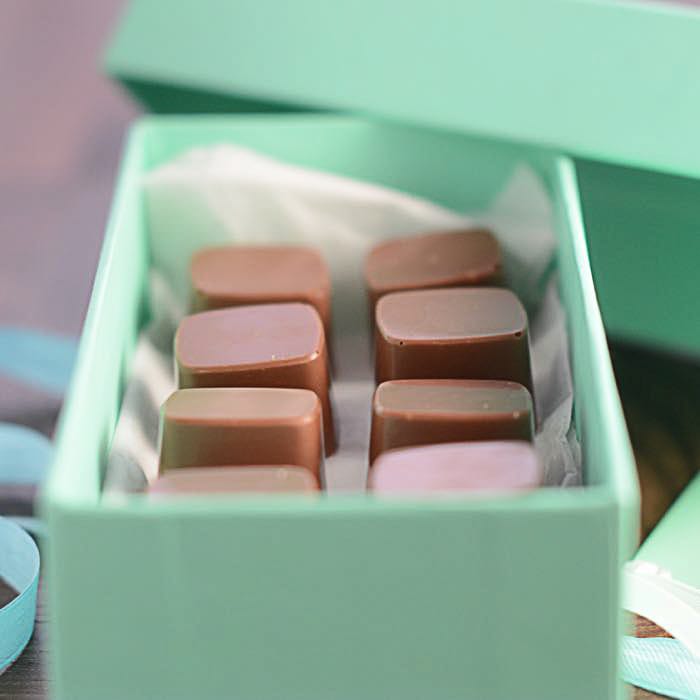
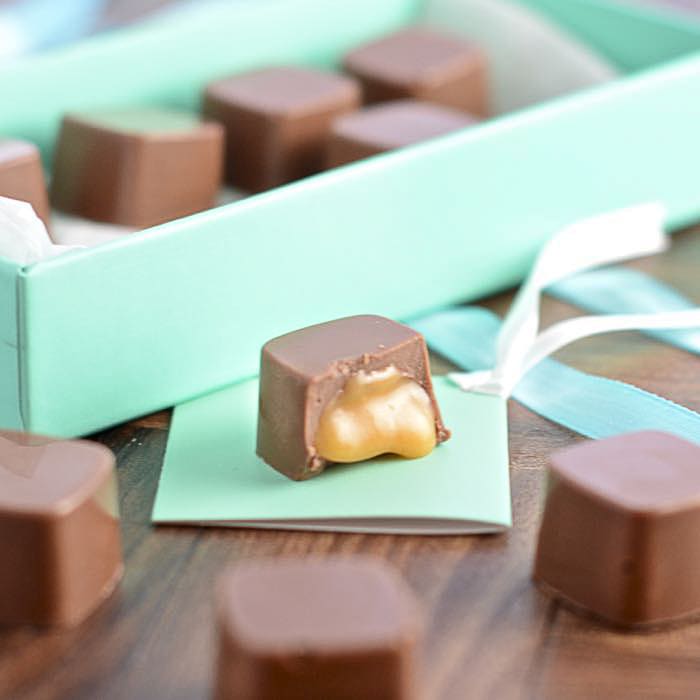
Caramel filled chocolates – Perfect as a gift or simply an indulgent treat for yourself. Find out how to make them yourself with this step-by-step tutorial.
 I mentioned in my recent How to Make Easter Eggs post that I attended a chocolate making course a few weeks ago which has captured my imagination. Since then I’ve been playing around with chocolate, figuring out what works and what doesn’t work so well. I think perhaps I’ve missed my vocation in life; I could be very, very happy working as a chocolatier (although I worry that I wouldn’t love it as much if I were making hundreds day in day out, so I think I’ll keep it as a rather delicious hobby).
After going on the course I immediately went and raided the Lakeland website for some chocolate making equipment, which included some chocolate moulds.
I decided they would be perfect for some filled chocolates. A while ago I shared my recipe for caramel sauce, which I thought would make a brilliant filling. I made my caramel sauce, which can be done a week or so in advance and stored in the fridge if you want. Alternatively, you could use a store-bought caramel sauce.
You can use the same steps to create all sorts of other filled chocolates, e.g. fondant or ganache. Just make sure that your filling is relatively thick so that the chocolate won’t sink when you pour it over the top to make the base of the chocolate (this would happen if you make something like liqueur chocolates).

How to make caramel filled chocolates
What you need
Good quality chocolate
I used Choceur from Aldi for these (it tastes delicious and is really good value). However, I’ve also used Lindt and Dr Oetker Fine Cook’s Chocolate in the past which also worked very well.
To make 10 chocolates I used a 200g bar of chocolate. This is far more than you need (each chocolate has about 8g of chocolate in it). However, due to the way the chocolates are made it’s much, much easier to do it if you have more than enough chocolate to hand. Don’t worry, the extra chocolate won’t go to waste, you can pour the melted chocolate onto some greaseproof paper, leave it to set, then wrap it up and save it to use again another day.
Chocolate Mould
I use this square chocolate mould from Lakeland, which can be used to make 21 chocolates. They also have swirls, shells and hearts in the same range which would all work well for making these chocolates.
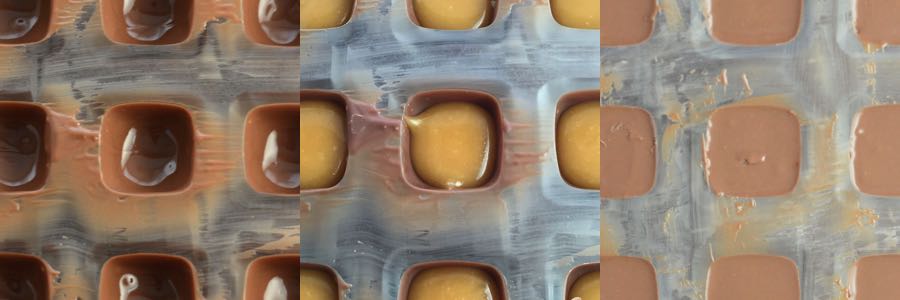
The chocolate mould in use – chocolate shells, then filled with caramel and topped off with even more chocolate
Something to melt the chocolate in
I usually melt mine in a small saucepan directly over a very low heat. However, many websites recommend using a bain marie (chocolate in a bowl over a pan of simmering water). You can also melt chocolate in a microwave, but it’s difficult to control the heat and ensure that the chocolate melts evenly.
If you choose to use a bain marie, then be extremely careful not to get any of the water from the pan into the chocolate, as a single drop can ruin an entire batch.
A cooking thermometer suitable for chocolate
You need to temper the chocolate, to give it its shine and ensure it comes out of the moulds easily (don’t worry, it’s pretty straightforward to do). I prefer to use a thermometer when I’m tempering as it takes any guesswork out and makes it highly likely you’ll get the right results every time.
I use this Thermospatula from Lakeland, which checks the temperature while you stir the chocolate (and it can be used for lots of other things too).
Bowl
To mix the chocolate.
Piping bag
To pipe the caramel into the chocolates. You may also want to pipe the chocolate into the moulds as this is a little less messy than pouring or spooning it in.
FREE GRAMS TO CUPS CONVERSION CHARTS
Subscribe to the Charlotte's Lively Kitchen mailing list to get your FREE printable grams to cups and cups to grams conversion charts for twelve popular baking ingredients
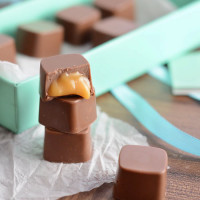
Caramel Filled Chocolates
INGREDIENTS
- 200 g milk chocolate - you won’t actually need this much but it’s much easier if you have more than enough chocolate
- 25 ml caramel sauce - if you’re making this yourself then make sure it’s cooled before filling the chocolates otherwise you’ll melt the chocolate shells.
INSTRUCTIONS
Temper the chocolate (If you're new to tempering chocolate then take a look at my video tutorial just below the recipe)
- Place about half of your chocolate into a small pan over a very low heat (or bain marie if you prefer) and heat the chocolate until it reaches a temperature of 45ºC – Don’t worry if not all of the chocolate has melted, it will continue to melt after it’s removed from the heat.
- Decant the melted chocolate into a bowl and add a piece of the unmelted chocolate you set aside before. Stir the chocolate in until it has melted.
- Keep adding pieces of the unmelted chocolate until the temperature of the chocolate has been reduced to 32ºC. At this point it’s ready to use.
- Remove any lumps of chocolate and set aside to use later – I like to put in onto greaseproof paper as then it’s easy to peel off and use again (it can be difficult to remove hardened chocolate from a bowl).
Fill the mould
- Pour the melted chocolate into the mould (or pipe if you prefer). Fill each of the squares you’re using to the top. Once filled, tip the mould upside down over the bowl you stirred the chocolate in and tip out any excess – you’re trying to create a hollow shell.
- Once the excess has tipped out have a quick check for any holes in the shells (the moulds are clear so these should be easy to spot if you hold it up to the light). If there are any holes then add in a little extra chocolate and tip again to remove any excess.
- Once you’re happy with the shells, use a sharp knife to scrape any excess chocolate from the top of the mould.
- Put the mould into the fridge for at least half an hour to set.
- Scrape any leftover chocolate from the bowl back into the pan you used to melt the chocolate originally (this can then be used to make the base of the chocolates).
- If you haven’t got pre-made caramel sauce then now’s the time to make it. You can find the recipe here.
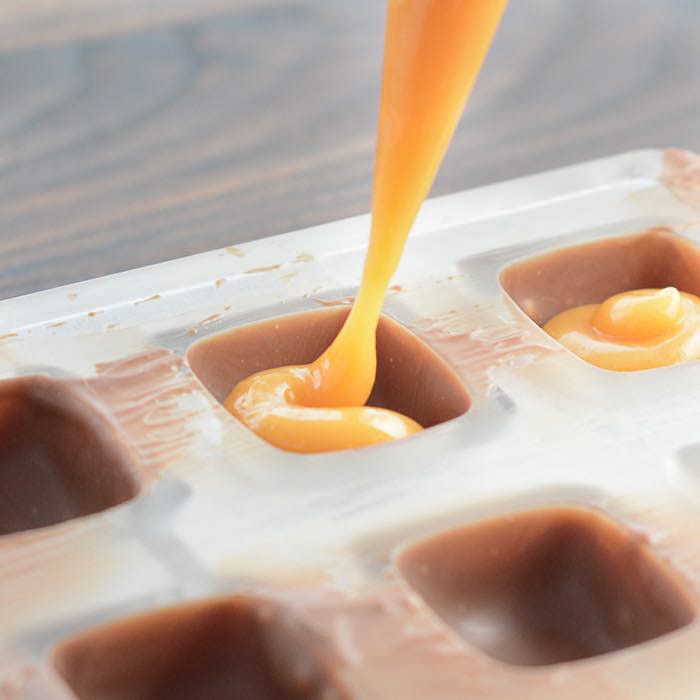
Fill the shells
- Put your caramel sauce into a piping bag and make a small hole (about 2mm) in the bottom.
- Remove your mould from the fridge.
- Carefully pipe about ½ tsp of caramel sauce into each chocolate. You want to leave a gap of about 2mm at the top of each one for adding the chocolate base.
- Put to one side while you temper the chocolate for the base.
Make the chocolate base
- Add about half of any unused chocolate you have in the packet to the chocolate you put back into the pan earlier and repeat steps 1-4 (above) to temper the chocolate. You can use the same bowl you used earlier even if it has some hardened chocolate in the bottom as it will melt in and help the tempering process.
- Once the chocolate has tempered, spoon or pipe it carefully over the top of the caramel – you want the chocolate to come above the top edge of the mould.Once all of the chocolates are covered, use a sharp knife to scrape off any excess chocolate.
- Put the chocolates into the fridge for at least half an hour to set.
- Once the chocolate has completely set, turn the mould over on a work surface and give it a pretty sharp bang against the edge of the surface (make sure your work surface is not too delicate you don’t want to damage it!) the chocolates should drop out. You might need to repeat this a few times to encourage them all out. If any are being stubborn then pop the mould back into the fridge for a while longer to give them a bit more time to set.
NOTES
NUTRITIONAL INFORMATION
Any nutritional information provided is the estimated nutritional information per serving. Please refer to my guide to Charlotte’s Lively Kitchen nutritional information if you would like to learn more about how this is calculated.
How to Temper Chocolate
If you’re new to tempering chocolate, then I’d recommend you take a look at my video tutorial which shows you the whole process. There’s also a more details post all about it here if you’d like to have a read.
Free From/Suitable For
The ingredients I used to make this recipe are all free from the following allergens. However, please check any labels carefully for allergens you need to avoid as brands can vary, and product recipes can change over time.
- Suitable for Vegetarians
- Gluten-Free
- Egg-Free
- Tree Nut-Free
- Peanut-Free
- Sesame-Free
- Sulphur Dioxide & Sulphite-Free
- Lupin-Free

Leave a Reply