My step-by-step guide to making Easter eggs at home.
When I was little one of the things I used to love about Easter eggs was cracking them open to see what treat was hidden inside. I’m not normally particularly nostalgic, but having two chocolate bars lined up next to the egg just isn’t the same for me, it takes away some of the excitement (clearly I was relatively easily pleased as a child!).
The solution – to make my own.
Not only does this mean you can fill them with treats, so they rattle nicely on Easter Day, it also means you can choose the treats, make them from your favourite chocolate, and add decoration to the outside to make them really special.
So, what do you need to make your own Easter Eggs?
Good quality chocolate (of course) – I used Lindt for these but I’ve also tried Dr Oetker Fine Cook’s Chocolate and Choceur from Aldi.
I’ve also tried Cadbury’s Dairy Milk, but that doesn’t melt well at all. The ingredients used make it are quite likely to sieze, which is where it goes hard, lumpy and basically unusable.
To make one egg in a 9x14cm mould I use 150g chocolate. However, I prefer to melt a bit more than I really need (as I’d rather have too much than not quite enough and then use the extra to make mini eggs, or let it set and put it away to use again another day).
Easter Egg Moulds
I use these reusable Easter egg moulds from Lakeland. You get four large moulds (enough to make two eggs) and four mini egg moulds (enough to make 36 mini eggs).
Something to melt the chocolate in
I’ve been purposely vague here as there are different ways to melt chocolate. I choose to melt mine in a small saucepan directly over a very low heat. However, many websites recommend using a bain marie (chocolate in a bowl over a pan of simmering water). You can also melt chocolate in a microwave, but it’s difficult to control the heat and ensure that the chocolate melts evenly.
If you choose to use a bain marie, then be extremely careful not to get any of the water from the pan into the chocolate, as a single drop can ruin an entire batch of chocolate.
Bowl
To mix the chocolate in.
A cooking thermometer suitable for chocolate.
I find it easier to temper the chocolate when making Easter eggs (I’ll talk a bit about what this is and the advantages of it a little later). Don’t worry, the name makes it sound technical and complicated and it really isn’t.
I use this Thermospatula from Lakeland, which checks the temperature while you stir the chocolate (and it can be used for lots of other things too).
A baking tray
This is used to melt the edges of the finished egg so you can stick the two sides together.
To temper or not to temper?
As I mentioned before, I prefer to temper my chocolate before making Easter eggs. Tempering chocolate is what gives it a lovely glossy finish and snap when you break it. If you don’t do this your chocolate will end up crumbly and dull-looking.
As well as the lovely glossy finish there are a couple of other advantages to tempering chocolate when making Easter eggs…
- It’s easier to get the finished eggs out of the moulds
- The melted chocolate has been cooled to a much lower temperature than when it was first melted, therefore it sets more rapidly (especially dark chocolate). This means that it’s easier to get the eggs a relatively uniform thickness across all sides – if the chocolate is too hot when you put it into the moulds it’ll slip down the sides leaving you with very thin sides and a thick puddle of chocolate at the bottom of the mould.
- When you put chocolate in the fridge it can sometimes start to look white and mottled when it cools. This won’t happen if it’s been properly tempered.
How to make Easter eggs
Temper the chocolate
If you’re new to tempering chocolate then I’d recommend you take a look at my guide which includes a quick video demonstration showing exactly what you need to do.
- Place about two-thirds of your chocolate into a small pan over a very low heat (or bain marie if you prefer) and heat the chocolate until it reaches a temperature of 45ºC (milk and white chocolate) or 48ºC (dark chocolate) – Don’t worry if not all of the chocolate has melted, it will continue to melt after it’s removed from the heat.
- Decant the melted chocolate into a bowl and add a piece of the unmelted chocolate you set aside before. Stir the chocolate in until it has melted.
- Keep adding pieces of the unmelted chocolate until the temperature of the chocolate has been reduced to 32ºC. At this point it’s ready to use.
- If you have any lumps of unmelted chocolate left, I’d recommend removing these and setting them aside to reuse at a later date (or as a mid-egg making snack).
Make the Easter Eggs
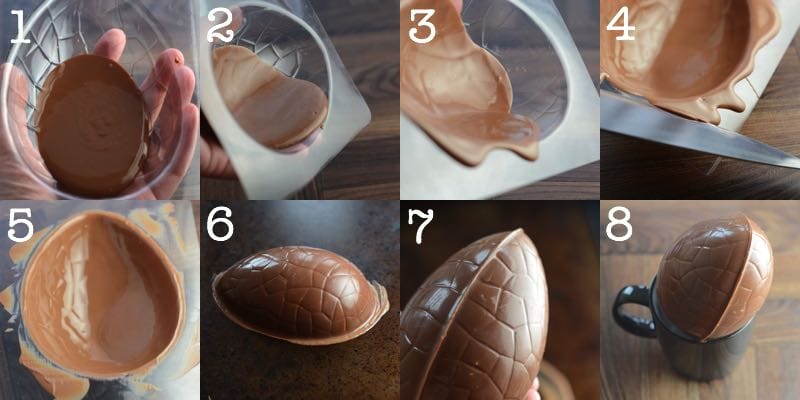
- Pour about 75g of chocolate into each mould, it’ll go about halfway up the side (picture 1).
- Gently tip the mould to spread the chocolate around the edges (picture 2). I recommend going slightly over the edges to ensure they’re thick enough to join later (picture 3). It’s best to hold the mould by the edges rather than cupping it in your hand as the heat from your hands may slightly melt the chocolate meaning you get a dull finish and potentially making it more stubborn to get out of the mould.
- Keep gently swirling the chocolate around until it won’t move any more (I’ve found this takes 3-4 rotations), trying to get it as even as possible.
- Once the chocolate won’t move about any more use a sharp knife to scrape off the excess chocolate (picture 4). It doesn’t have to be perfect as long as most of it’s gone (picture 5).
- Pop the egg into the fridge to set completely (I find this usually takes about half an hour).
- Repeat for each of the eggs. If the chocolate has hardened too much while you’ve been making the first ones then gently heat it back to 30ºC before pouring into the mould.
- Once the egg has set it’s time to get it out of the mould. Remove it from the fridge, turn it over and give it a hardish tap on a flat surface. If it’s ready to come out then it will fall out easily. If it doesn’t then pop it back into the fridge for a bit longer.
- Put a baking tray into the oven at a low temperature (I use 50ºC). Once the tray has warmed, remove it from the oven and very gently put the egg edge side down onto the warm tray until the edges are just starting to melt (picture 6). Do this for both sides of the egg and then carefully line the edges of the two halves up and stick it together (picture 7).
- Put it into a cup (or similar) to hold it in place until the chocolate has set.
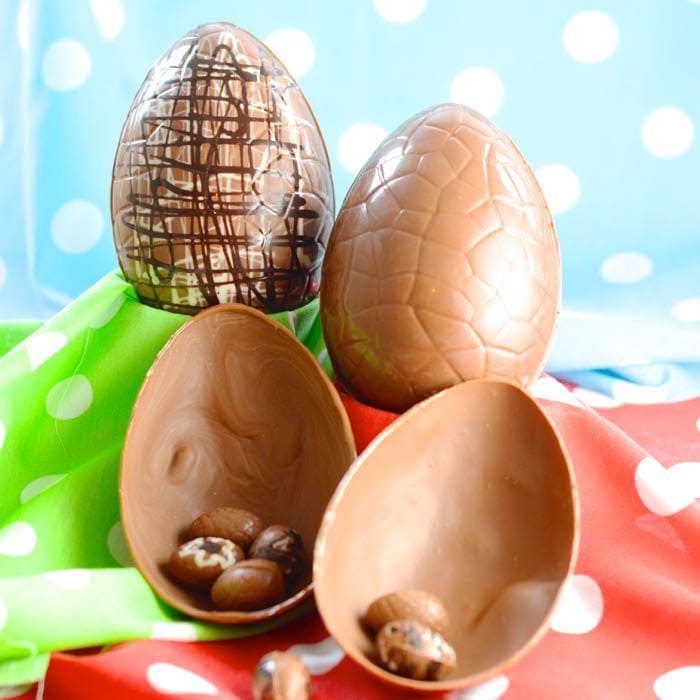
And there you have it, your completed egg…
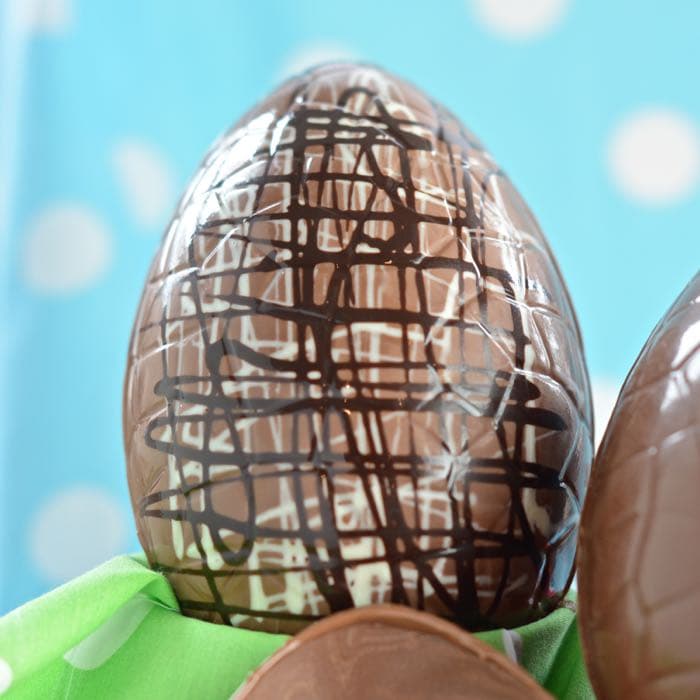
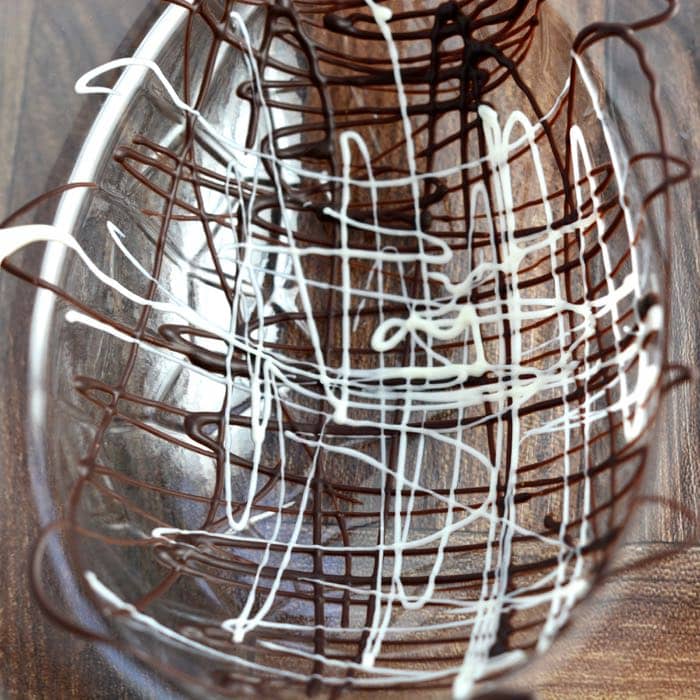
If you want to add decoration (as I’ve done above) follow the same steps to temper the different chocolates (one at a time, allowing each type to set before adding the next) and then pipe your design into the mould. Leave the decoration to set before adding the chocolate to make the main egg.
A couple of points to note if you’re adding a design…
- If you’re adding writing you’ll need to write the words backwards.
- Make sure you trim the edges before you put it in the fridge to set (as you did with the edges of the main eggs).
- When swirling the chocolate around for the main egg it’s especially important you hold the mould by the edges rather than the body of the egg. The heat from your fingers can melt the chocolate design meaning that it looks smudgy on the final egg.
So all that’s left for me to do now is to wish you all a very happy Easter xx
 Learning to temper chocolate
I originally learnt to temper chocolate on an evening course with Oliver Dunn at the Cheshire Cookery School. This was a course I received as a Christmas gift from family, but I wanted to mention it here as it was a fabulous course which I would thoroughly recommend to others wanting to learn the basics of chocolate work. It gave me a great grounding in skills such as tempering chocolate which I’ve since built on.



em says
thank you so much for taking the time to reply. Thanks for your advice on storage of the eggs 🙂
Em says
Thank you so much for replying. Can’t wait to ‘crack’ on with it just one more thing can these be made in advance, say for a couple of weeks and if so how would you store the shells until ready to fill and assemble? Thanks so much
Charlotte Oates says
They’re absolutely fine to store for as long as you would have stored the chocolate you made them from. I’d store them in the fridge to help keep them firm, but they should be fine stored in a cool room away from any heat (the same as you would store any other chocolate you didn’t want to melt).
Em says
Thank you for this Charlotte I’ve looked at lots of info on the net about tempering chocolate, your version is much simpler /easier to understand so thanks. I’ve got the moulds and the spatula just need to check – as there are different max temperatures for the chocolate is it the same for the reduced temp or do all three kinds of chocolate need to be reduced to 32c regardless of whether it’s dark, milk or white ? Thanks
Charlotte Oates says
I heat to 48C for dark chocolate and 45C for milk and white. All three are reduced down to 32C.
Lisa says
How do you stop your chocolate from melting as my eggs are for a competition
Charlotte Oates says
Store them in the fridge until they’re needed.
Yum Girl says
Thanks so much for submitting to Yum Goggle! We hope you will continue to submit and we have shared on all our social media outlets! Also following you now on all of yours!
Charlotte Oates says
Thanks you x
Emma White says
Aw amazing and I am going to def try this with the kids , I remember my aunt making some with us as a child but the chocolate I remember was just YUK, I have tried to melt Dair Milk before and it doesn’t melt well.
Charlotte Oates says
I used Lindt for mine and they tasted lovely!! I hope you enjoy making them.
Honest mum says
Amazing post, would never think to make my own chocolate eggs, thanks for this. Thanks for linking up to #tastytuedays
Charlotte Oates says
Making daft things like Easter eggs or cake decorating are what I love to do most in the kitchen so I’m always on the look out for unusual new things to try!
North East Family Fun says
I tried this last year with little success 🙁 Always willing to give it another go though using your tips! #TastyTuesdays
Charlotte Oates says
It took me a few goes to figure out the best way. My first ones looked great but shattered when I tried to get them out! I hope you have more success next time.
jean atkinson says
happy easter x.
jean atkinson says
they look lovely charlotte
daniel and josh will be excited
you have a talent xx.
Charlotte Oates says
Thanks Jean. Josh has recently mastered the word “chocolate” and is now using it regularly!
Renee @ Mummy Tries says
This is a brilliant post so full of detail. I made Easter eggs last year doing what you’ve done here (although yours are MUCH better) and my 5yo loved them. She’s very excited at the prospect of there being more on the horizon #tastytuesdays
Charlotte Oates says
Thanks Renee. I had to break one (for photo purposes) so they got an early taster which they enjoyed.
Vicki Montague - The Free From Fairy says
What a fabulous tutorial! I never knew tempering chocolate was that easy! I am a very mean mum and won’t be giving the kids (or anyone) sweet things this Easter. There is far too much sugar in the world so we are going to Longleat as a treat instead. Am sure the kids would rather have chocolate but hey ho!!!
Charlotte Oates says
I love Longleat, we went there a couple of years ago and had a great day out. I hope you all enjoy it x
Fionnuala says
Thanks for this Charlotte. I have a mould but didn’t get to use it last year and had been planning to give it a go for this Easter. This is just what I needed to get me started.
P.S. I have had the same experience with Cadbury’s Dairy Milk. Lovely to eat but dreadful for cooking with.
Charlotte Oates says
I made the mistake of trying to make dairy milk chocolate dinosaurs for my boys. It was a complete disaster.
Luca Marchiori says
I’ve got my chocolate (Valrhona Noir Caraïbe 66%), I’ve got my moulds, I’ve even bought a new thermometer. Now all I need is the courage to steam up my bain marie and make the shells. Your wonderful post has given me the kick I need. Easter Eggs here we come.
Charlotte Oates says
Great! Just make sure your bain marie isnt too steamy, a drop of water in your chocolate could mean disaster!
I’d love to see a picture when you’re done. You can tweet me or tag me on instagram (myrecipebookuk for either).
Laura says
Wow these looking incredible! And so professional looking!!
Charlotte Oates says
Thanks Laura. It took a bit of practice to get them right but I’m really happy with how they turn out now 🙂
Vicky says
I saw this on Pinterest and I was intrigued because I have the exact same moulds,. However, they have been collecting dust since I seemed to break my perfectly set chocolate egg every time I took it out of the mould! You’ve inspired my to try this again – hopefully I’ll have more success this time around with your wonderful tips.
Charlotte Oates says
Thanks Vicky. Just remember to stick to the temperatures and make sure the eggs is a reasonably even thickness and they should turn out just fine. Also if they do go wrong for some reason you can just melt down the same chocolate and start again (I’ve done that a few times, that’s how I came up with the tips!!).
Mel says
I’m not reading your post as we’re making ours next week and I don’t want to be influenced & end up writing the same thing, he he! I was wondering whether it might be too early to make them, but I want to give some to friends at work, and I have received the cute treats that are going inside (easily pleased, moi?). One question (you might have answered it already): I normally make small chocolate things like truffles and lollies so I’ve never had that issue before: what do you wrap your eggs in to keep them lovely and shiny / fresh until Easter? I was thinking baking paper but not particularly pretty.
Charlotte Oates says
That’s a very good question. On my chocolate course we used thin plastic the sort you’d see wrapped around flowers which was sellotaped at the bottom and tied with a ribbon at the top. If you have space then you’re best off keeping them in the fridge so there’s no risk of a warm day (or a cold day with the heating on) melting the chocolate and leaving it with a dull finish when it resets.
Looking forward to reading about your eggs x
Mum says
Wow – another brilliant tutorial. Think I will be adding some of this kit to my Wishlist!
And yes – luckily for us you were relatively easily pleased as a child!
Charlotte Oates says
Thanks Mum xx I’m so glad you agree 🙂