How to decorate a birthday cake to look like a birthday present, complete with fondant bow. It’s easier than you’d think and doesn’t need lots of fancy equipment.
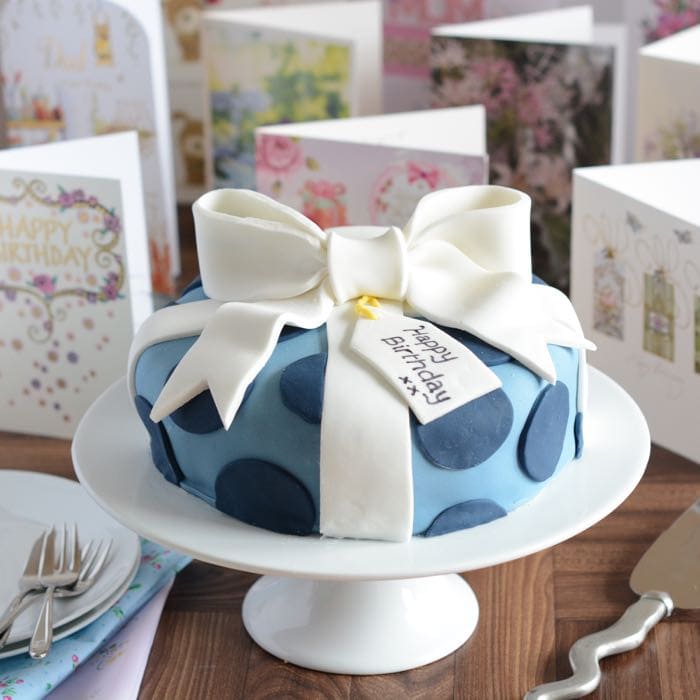 A couple of weeks ago it was my in-laws’ birthdays (they’re only a few days apart) and each year I like to make them a birthday cake to celebrate. Choosing a cake to make is always a bit of a challenge as I always have loads of ideas for children’s cakes, but not many for adults. As usual I turned to google image search for a bit of inspiration and decided to make them a birthday present cake. Shhhh, don’t tell them, but it turns out that making a birthday present cake is pretty straightforward and only uses a minimal amount of basic equipment. However, the best thing about it is that it looks like it took a lot more effort! I therefore decided it would be perfect for a cake decorating tutorial.
What you’ll need
A cake – I used my go to all-in-one vanilla sponge recipe which is perfect for decorating. I baked it in two 20cm round cake tins. However, you can make the cake any shape you like, the idea is the same. You can also use a shop bought cake if you don’t fancy baking. I filled my cake with a layer of raspberry jam and buttercream, and then also covered the outside in a layer of buttercream. This has three advantages…- It helps to get the fondant smoother when you cover the cake.
- It helps the fondant to stick to the cake.
- In my opinion buttercream tastes nicer than fondant. I usually cover cakes with fondant because of the way it looks but I don’t generally eat it!
How to decorate a birthday present cake
- Ice the main cake
- Colour the fondant for the main cake (assuming you’re not using ready-coloured fondant). I use about two-thirds of the fondant (1kg), setting the rest aside for the spots and ribbon cross. Add a small amount of colour to the fondant and knead it until the colour is even. If it’s not dark enough then add more colour and knead again (remember you can always add more colour but you can’t take it away).
- Sprinkle a thin layer of icing sugar onto your work surface and roll out the fondant. It needs to be at least the width of your cake plus sides, and I like to have an inch or so extra on each side as this makes it easier to cover the cake. Keep shifting the fondant slightly as you roll to ensure that it doesn’t stick.
- Carefully move your fondant across to the cake and place it as centrally as possible. Gently press down the sides, trying to ensure that there are no folds.
- Use a sharp knife to carefully trim the edges.
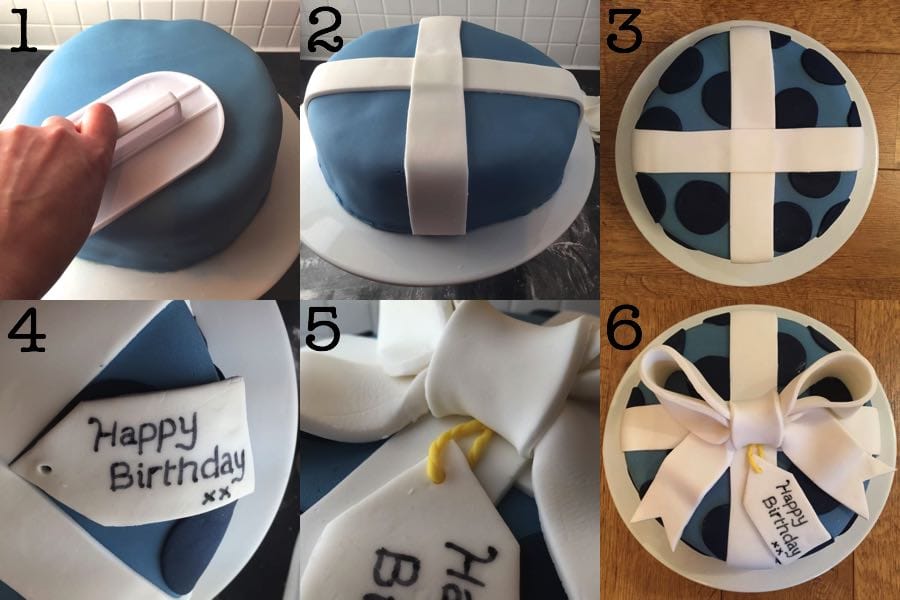
- I like to use a cake smoother to even out any little lumps and bumps (picture 1). Don’t worry if it’s not completely even, it’s amazing what you can hide with some carefully placed decoration!
- Make the cross part of the ribbon
- Sprinkle a thin layer of icing sugar onto your work surface. Roll out about 250g of the remaining fondant into two strips about an inch-and-a-half wide and the width of your cake plus two sides long. Its easiest to start by rolling the fondant into a long sausage shape with your hands and then roll it flat with the rolling pin.
- Put a little water onto the back of each strip and lay the two strips across the centre of the cake at right angles to each other. The water acts as glue to hold the strips in place.
- Add the spots (or whatever shape you prefer)
- Colour the remaining fondant (keeping a small amount back for the label).
- Sprinkle a thin layer of icing sugar onto your work surface and roll out the fondant.
- Use the circular cutter to cut circles and place them on the cake (picture 3), using a small amount of water on the back to help them stick. Keep some circles whole and cut some to put on the edges of the ribbon/cake.
- Make the label
- Roll out a small piece of the leftover white fondant and cut it into the shape of a label. Keep any offcuts to make the string. Use the point of the knife (or a skewer if you have one) to make a hole for the string.
- Use your food colouring pen to write your message. You’ll need to press quite gently to avoid pressing the pen through the fondant.
- Use a little water to stick the label to the cake. Aim to put it towards the centre-front so that it’s not covered by the bow (picture 4).
- Make the string (this is actually the fiddliest part as it’s very delicate). If you’re having trouble with this part then you could always tuck the label up under the bow so it’s not needed. Colour the fondant and gently roll it into a very, very thin sausage about 3 inches long. Carefully fold it in half and twist the two halves around each other to create a cord.
- Tuck one end of the string into the label hole, run it up the the centre of the cake and then rest the other end against the side of the label (as if to suggest that it’s going underneath to the back of the hole) (picture 5).
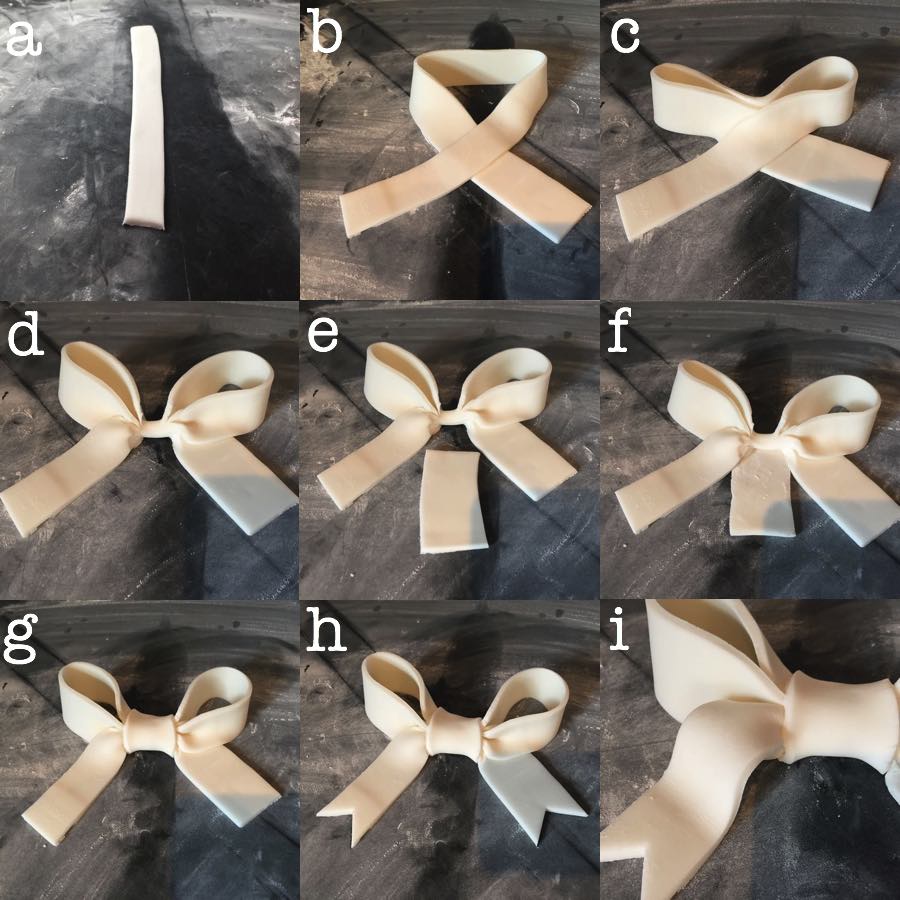
- Make the bow (step-by-step images below) – note modelling paste hardens relatively quickly so try and work as fast as possible to stop the bow cracking.
- Knead the modelling paste a few times to soften it and make it pliable.
- Roll the modelling paste into a thin strip the same width as the ribbon cross on the cake and about 70cm long (picture a). Trim with a sharp knife to make it even. Cut off about 10cm and set aside.
- Fold one end of the fondant over the other (picture b).
- Push the centre of the strip down to meet the cross point (picture c).
- Pinch together the centre of the strip and the part where it crosses (picture d).
- Take the 10cm strip that you set aside and tuck it under the the join (pictures e & f). Wrap it around and tuck it back under the other side (picture g).
- Use your sharp knife to cut a triangle at the two ends of the ribbon (picture h).
- Gently lift the ends of the ribbon so that it doesn’t sit completely flat (picture i).
- Leave the bow to dry and once dry very carefully place in the centre of the cake (picture 6 above).
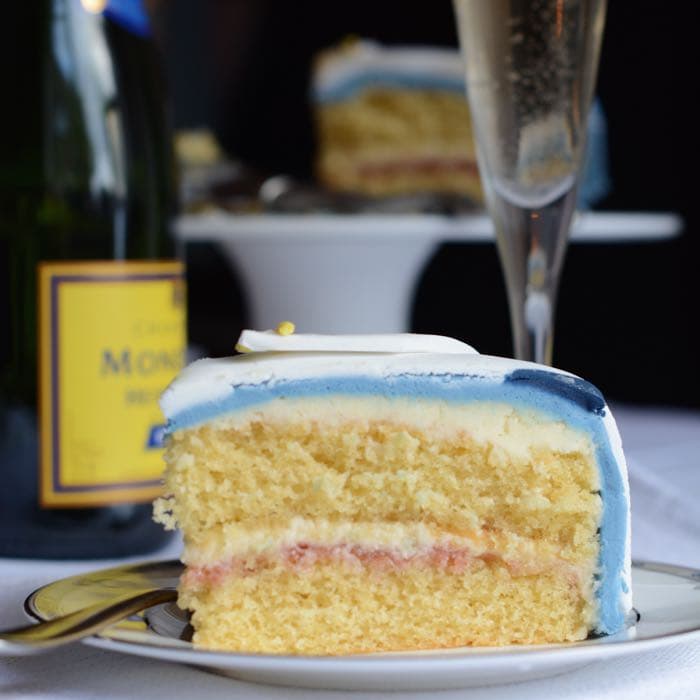
 And there you have it… A fabulous birthday present birthday cake.
 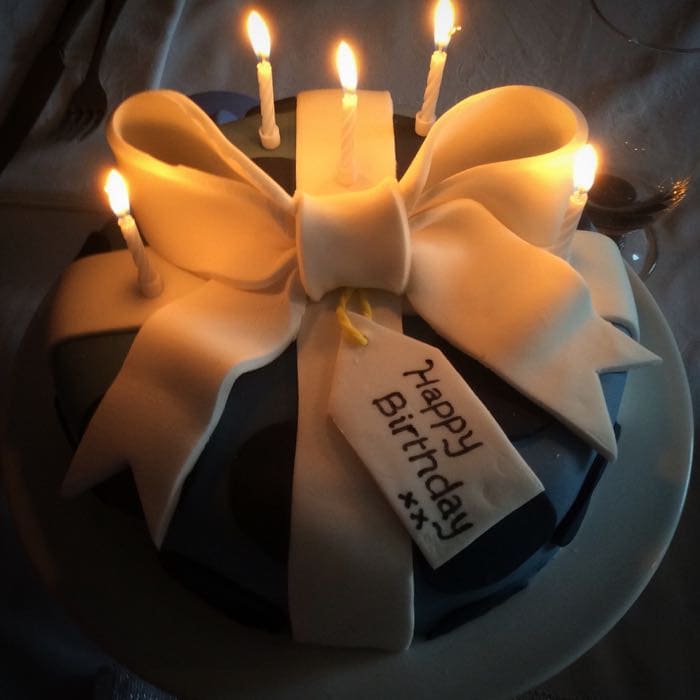 I couldn’t resist sharing a couple of shots of the delicious inside of the cake too!!
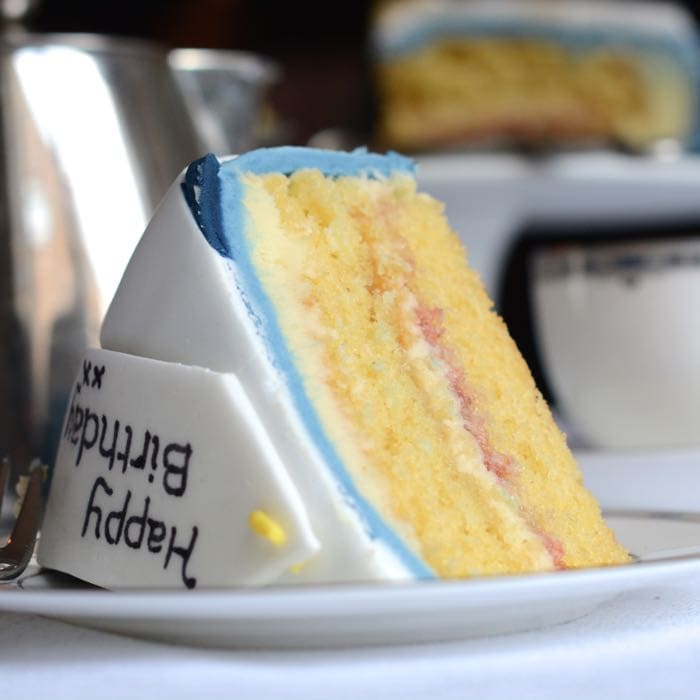
FREE GRAMS TO CUPS CONVERSION CHARTS
Subscribe to the Charlotte’s Lively Kitchen mailing list to get your FREE printable grams to cups and cups to grams conversion charts for twelve popular baking ingredients
Gladys says
I would like to decorate a readymade cake with fondant for a little girl’s first birthday.
The theme is Mickey Mouse Pink with White Dot/ White with Pink Dot with a Bow.
Happy birthday and her name written at bottom of cake. What kind of tools is needed?
I would like to use a round cake but I am not sure of the size.
Your help will be highly appreciated
Charlotte Oates says
Hi Gladys.
You should be fine with the equipment listed on this post as well as some letter cutters. I have these ones from M&S and they’re fab (you can probably find many similar ones online). Simply stick them onto the cake as you would the spots.
The size of cake depends on how many people you’d like to feed and how big they’re appetites are. Let me know roughly how many and I’ll suggest a cake size for you.
Teresa says
Loved your Peppa Pig tutorial, definitely going to make a cake for my grand-daughter, with Peppa on the top – she’ll love it. Thanks Charlotte
Charlotte Oates says
That’s brilliant. Send me a picture when it’s done.
Lisa says
Hi, I tried your Vanilla cake recipe the other day and it turned out lovely, will try this chocolate one next. Do you ever freeze your cakes to decorate nearer the time you need them? Wasn’t sure if that affected flavour or dried it out or anything.
Thanks
Charlotte Oates says
I tend to make mine fresh a day before I plan to decorate them. but I know the vanilla cake freezes well. Make sure you wrap it up in clingfilm before you freeze it to protect it in the freezer. I’ve not tried freezing the chocolate cake, it’s quite a similar mix to the vanilla cake so I’d imagine it should be fine but I can’t guarantee it.
Joyce says
Thankyou charlotte
Joyce says
Hi Charlotte,
Could you tell me how deep your 2x20cm tins are.Thankyou
Charlotte Oates says
They’re sandwich tins so about 4.5cm deep each.
Jas says
Hi I’ve been trying to make the butter cream icing but it always tastes gritty can you please help with this ? Thank you
Charlotte Oates says
Hi Jas, what type of sugar did you use? The only reason I can think that it would taste gritty is if you’ve used a different type of sugar.
Mel says
It looks beautiful! Can you make this with almond paste for example? I find fondant quite disgusting, but love pretty cakes 🙂
Charlotte Oates says
I’m with you, I’m not a huge fan of the taste of fondant but I use it because it makes my cakes look pretty. I usually put a thick layer of butter icing beneath the fondant and eat that instead!
This cake should work with almond paste, although I find almond paste as little more tricky to work with so you make not get such a smooth result. I tend to find that it can be stickier and more crumbly that fondant/modelling paste so you’d need to make sure you use plenty of icing sugar to prevent it from sticking to your work surface and handle it very carefully, especially when covering the cake and making the bow. If you prefer the taste of almond paste you could always put a layer of it beneath the fondant and just eat that like I do with the butter icing.
Mel says
Great idea! Looking back at your photos, I can see the icing there 🙂 Makes sense!
Sophie @ Mum, M & More says
Wow, this is amazing. It looks wonderful, I don’t think I would even try to attempt this as I think it would be a disaster. You are so talented! #sundaysweets
Charlotte Oates says
Thanks Sophie, it’s honestly easier than it looks but I’ll take the compliment anyway 🙂
I’m sure if you decided to give it a go then you’d be pleasantly surprised at what you could make.
Toni @ Gym Bunny Mummy says
Such a fab tutorial, it would be so simple to follow and the end result looks amazing! Thanks for joining in #SundaySweets
Charlotte Oates says
Thanks Toni. Your cakes always look amazing so that’s a real compliment x
Howie Fox says
That is pretty amazing! Now even I feel I couldmake a birthday cake like that. Cool tutorial, thanks! 🙂
Charlotte Oates says
Thanks Howie, I’d love to see a picture if you ever do!